Welcome to The Real Blogger Status - Beta. Please note the warnings (as of 6/13: 0 active), and the alerts (as of 1/10/2007: 5 active).

Please be aware of the naming variances in this blog. You will find various references to "Classic" / "Old Template 2006" Blogger, and to "Beta" / "New Template 2006" Blogger.
Showing posts with label Features. Show all posts

Wednesday, February 14, 2007

Publishing Externally? Republish To Blog*Spot Before Publishing To A Custom Domain

If you're currently publishing your blog externally, because you want to use a non-Blog*Spot address, you may have looked at your friends who are now publishing to a Google Custom Domain, and envied all of the shiny features in New Blogger that they can now use.

(Note): This post has been migrated to (and improved in) The Real Blogger Status: Publishing Externally? Republish To Blog*Spot Before Publishing To A Custom Domain.

Now publishing externally was how you got to use a non-Blog*Spot address for your blog, under Old Blogger. But with New Blogger, and the HTML served dynamically, blogs published externally couldn't use all of the features. So Blogger developed Custom Domains, where the blogs could be published to the Google servers (enabling dynamic HTML), and use externally hosted DNS to point a non-Blogger domain into the Google servers (enabling non-Blog*Spot addresses).

Let's say that you have a blog, published to a section of your website, as "mydomain.com\blog".

  1. Setup the rest of your website, to point to your blog as "myblog.mydomain.com".
  2. As I describe in Custom Domain setup Step2, point "myblog.mydomain.com" to "ghs.google.com".
  3. Republish your blog back to Blog*Spot, let's say as "myblog". Go to Settings - Publishing, select Blog*Spot Address, and provide "myblog" for the Blog*Spot Address.
  4. As I describe in Custom Domain setup Step3, now publish your Blog*Spot blog "myblog" to "myblog.mydomain.com", on Google servers.


If you only have your blog, and nothing else, the task is a bit simpler.
  1. Republish your blog back to Blog*Spot, let's say as "myblog". Go to Settings - Publishing, select Blog*Spot Address, and provide "myblog" for the Blog*Spot Address.
  2. As I describe in Custom Domain setup Step3, now publish your Blog*Spot blog "myblog" to "myblog.mydomain.com", on Google servers.


The key step here is that your blog has to be hosted on Blog*Spot, before a Custom Domain forwarding can be successfully setup. Your Blog*Spot URL ("xxxxxxx.blogspot.com") will forward, automatically, to your custom domain. This saves those with an established blog at "xxxxxxx.blogspot.com" from losing that address to sploggers.

Complicated? Not really. Just take it one step at a time. Just pray that you don't get the old monolithic error
Another blog is already hosted at this address.


>> Forum thread links: bX-*00028

>> Copy this tag: bX-*00028

>> Top

Thursday, February 08, 2007

Custom Domains And URL Forwarding - A Bad Idea

If you're trying to get your Custom Domain setup to work, and are frustrated (as I am) by the fact that you can't get both "www.yourdomain.com" and "yourdomain.com" to forward properly, you may have complained to your DNS provider, suspecting that the problem is one which they must resolve.

And in some cases, your DNS provider may not know how to setup a "CNAME" record. Some providers only use "A" records.

Some DNS providers will convince you to use URL forwarding, where your domain is redirected to the DNS providers servers. They set their servers to simply load any portion of the desired website ("www.yourdomain.com" or "yourdomain.com") from your Blog*Spot website ("yourblog.blogspot.com").

This will indeed load the content, as desired. There are several downsides to this "solution", though.

  • Your DNS provider may have to set this up in their servers, it's possibly not a DNS setting that you can make.
  • As the reader views your redirected blog, the content of the address bar in the browser will constantly indicate "www.yourdomain.com" or "yourdomain.com", with no detail about the actual URL being viewed.
  • We're unsure about how well search engine spiders, and other robotic visitors, will react to URL forwarding.
  • URL forwarding bypasses the load balancing provided by "ghs.google.com", and this is bad for everybody.


Blogger has admitted that Custom Domains needs work. Let's wait for them to figure out how it should be setup, at their end. Try and avoid using URL Forwarding, unless you are really desperate.

>> Top

Wednesday, January 31, 2007

Google Custom Domain - Case Study #2

I've been working with Google Custom Domains for several weeks now, first on other peoples domains, then some on my own, and finally on more of other people. In very few cases can someone get a custom domain to work completely.

We'll take my church blog as an example here, as we did with Case Study #1. This blog has 4 aliases.

  1. http://martinezumc.blogspot.com/
  2. http://www.martinezumc.blogspot.com/
  3. http://martinezumc.org/
  4. http://www.martinezumc.org/


Current DNS settings


Simply one "CNAME" pointing to "ghs.google.com". No "A" record, as discussed in Google Custom Domain - The DNS Referral.

Let's test what we have now.
C:\>ping martinezumc.org

Pinging ghs.l.google.com [66.249.81.121] with 32 bytes of data:

Reply from 66.249.81.121: bytes=32 time=124ms TTL=244
Reply from 66.249.81.121: bytes=32 time=126ms TTL=244
Reply from 66.249.81.121: bytes=32 time=123ms TTL=244
Reply from 66.249.81.121: bytes=32 time=143ms TTL=244

Ping statistics for 66.249.81.121:
Packets: Sent = 4, Received = 4, Lost = 0 (0% loss),
Approximate round trip times in milli-seconds:
Minimum = 123ms, Maximum = 143ms, Average = 129ms

C:\>ping www.martinezumc.org

Pinging ghs.l.google.com [66.249.81.121] with 32 bytes of data:

Reply from 66.249.81.121: bytes=32 time=126ms TTL=244
Reply from 66.249.81.121: bytes=32 time=124ms TTL=244
Reply from 66.249.81.121: bytes=32 time=126ms TTL=244
Reply from 66.249.81.121: bytes=32 time=122ms TTL=244

Ping statistics for 66.249.81.121:
Packets: Sent = 4, Received = 4, Lost = 0 (0% loss),
Approximate round trip times in milli-seconds:
Minimum = 122ms, Maximum = 126ms, Average = 124ms


Both "martinezumc.org" and "www.martinezumc.org", verified by pinging, pointing to "ghs.google.com".


I can publish to martinezumc .org with no problem


I cannot publish to www. martinezumc .org.


And once again, the infamous
Another blog is already hosted at this address

And here, for reference, is a DNS Report for martinezumc.org.

(Edit 2/7): Blogger Employee promises us
We're working on a fix for the current problem some users experience when switching between custom domains and Blog*Spot.


(Edit 2/12): Blogger Employee understands the frustration.

>> Top

Saturday, January 20, 2007

Editing The Template In A New Blogger Blog

The template in a New Blogger blog, when published to Blog*Spot (or to a Google Custom Domain) is written in XML, not HTML. A lot of HTML based tweaks won't work in New Blogger.

If you force HTML into your template, you may end up with one of the new, cryptic error codes

bX-lgwej
This says that your post template contains invalid HTML.

Are you seeing this error? If so, don't despair.

XML is not as user friendly as HTML was. But 90% of the HTML based tweaks can probably be copied into HTML page elements in the GUI Page Elements section of the Template. Forget about raw XML, and use Page Elements.

XML is not as forgiving as HTML. You may have to learn some discipline, when coding New Blogger template entries, and even posts.

Most HTML tags, like the Anchor tag, come in pairs.

<a href="http://bloggerstatusforrealbeta.blogspot.com/
2007/01/editing-template-in-new-blogger-blog.html">
http://bloggerstatusforrealbeta.blogspot.com/
2007/01/editing-template-in-new-blogger-blog.html</a>
is an anchor link to this article. Notice the
<a...> ... </a>
pair.

Some HTML tags, like the Break tag, don't come in pairs.
<br>
is a tag that I use a lot. There is no sequence
<br> ... </br>
A Break tag, in strict HTML, is better written as
<br />


The requirements of strict HTML you will probably have to learn from experience. An Object tag can't be written as the Break tag is written.
<object />
isn't valid. Nor is a simple
<object ... >


Here's how I got an embedded video object to work, in my Miscellaneous Musings post More Bumper Cars
<span style="text-align: center; display: block;"><object height="350" width="425"><param name="movie" value="http://www.youtube.com/v/z9tKWzxSZ5E"><embed src="http://www.youtube.com/v/z9tKWzxSZ5E" type="application/x-shockwave-flash" allowscriptaccess="samedomain" height="350" width="425"></embed></object></span>
Note the Embed and Param tags, too. The Param didn't require pairing. The Object and Embed tags did - you'll get errors when publishing with them unpaired. I got an error when I tried publishing Object as
<object ... />
The only solution was to publish it as
<object ... > ... </object>
Apparently all tags aren't as versatile in formatting as the meta tag is. Life isn't fair, nor is strict HTML easy. Deal with it.

>> Top

Tuesday, January 16, 2007

Your Custom Domain Blog, And AdSense

The whole idea of Google Custom Domains for Blogger blogs is great, as it gives us most of the benefits of an externally published blog, plus the New Blogger Layouts Templates features. But there's a major flaw currently in there.

If your blog is accessed as both "www.myblog.com" and "myblog.com", this won't work. AdSense appears to be sensitive to this problem. Tell Blogger that this is a major problem.


>> Top

Monday, January 15, 2007

Google Custom Domain - Case Study #1

OK, Chuck. Time to put your money where your mouth is.


I've been writing about Google Custom Domains for almost a week now.

So, it's time to test what I've learned.

(Note): This post has been migrated to The Real Blogger Status: Google Custom Domain - Case Study #1, and has been substantially expanded in The Real Blogger Status: Diagnosing Problems With Custom Domains, and in the series The Real Blogger Status: Custom Domains Diagnoses.

This case study uses my church website, martinezumc.org, with DNS service provided by GoDaddy. So, I logged in to the GoDaddy control panel, and followed the Google GoDaddy instructions (instructions for other hosting services are also in that document). Steps 1 - 4 were on target. So, I document below Steps 5 - 7 of the instructions, which became my steps 1 - 8.

Note that GoDaddy is simply the example that I use here. Blogger provides How do I create a CNAME record for my custom domain?, which provides instructions for half a dozen different popular DNS Hosting companies.

Step 1

The Default GoDaddy Settings


Here we see all DNS entries created by GoDaddy, when "martinezumc.org" was setup originally. All entries point to GoDaddy, using an "A" record equating "@" (the domain root) to "68.178.232.100".

Step 2

Just 2 Quick Changes


  1. I deleted the "A" record pointing the domain to GoDaddy.(See Note 2, below)
  2. I added a "CNAME" record equating "www" to "ghs.google.com".
For more detail about DNS records, see PCMagazine Definition of: DNS records, or FAQs.Org: How DNS Works.
(Note 1): This example is for a domain setup for the ".org" TLD, and using GoDaddy as the registrar. All experience so far indicates that the different TLDs (.com, .info, .net, .org, ...), and the different registrars (like GoDaddy) have different rules. Be careful here, and ask questions in Blogger Help Group: How Do I?, if anything here is not completely clear to you. We are still learning the details, and I suspect Blogger staff is too. If you have any doubt about the effectiveness of your DNS setup, execute Step7 below, and proceed only when you get similar results.
(Note 2): If you have an existing website with other content, and just want to add the blog as "blog.mydomain.com", don't delete the "A" record. Just add a "CNAME" record equating "blog" to "ghs.google.com".

Step 3

I Setup Blog Publishing


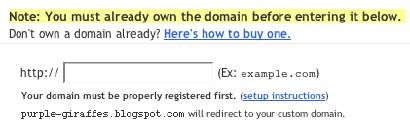
I went into Settings - Publishing for the blog currently published at "martinezumc.blogspot.com", selected "Switch to: Custom Domain", and set it to publish to "martinezumc.org". Note that it clearly warns us
martinezumc.blogspot.com will redirect to your custom domain.
with no mention of www.martinezumc.blogspot.com. This makes it unlikely that we should expect "www.martinezumc.org" to work.

Step 4

I Tested martinezumc .org


Success!

Step 5

I Tested www .martinezumc .org


Here we see just what I predicted, in Step 3, above.

Step 7
And to verify the GoDaddy setup (and diagnose the 404), a simple set of ping tests.
C:\>ping martinezumc.org

Pinging ghs.l.google.com [64.233.179.121] with 32 bytes of data:

Reply from 64.233.179.121: bytes=32 time=94ms TTL=242
Reply from 64.233.179.121: bytes=32 time=92ms TTL=242
Reply from 64.233.179.121: bytes=32 time=94ms TTL=242

Ping statistics for 64.233.179.121:
Packets: Sent = 4, Received = 4, Lost = 0 (0% loss),
Approximate round trip times in milli-seconds:
Minimum = 92ms, Maximum = 94ms, Average = 93ms

C:\>ping www.martinezumc.org

Pinging ghs.l.google.com [66.249.81.121] with 32 bytes of data:

Reply from 66.249.81.121: bytes=32 time=94ms TTL=242
Reply from 66.249.81.121: bytes=32 time=93ms TTL=242
Reply from 66.249.81.121: bytes=32 time=96ms TTL=242

Ping statistics for 66.249.81.121:
Packets: Sent = 4, Received = 4, Lost = 0 (0% loss),
Approximate round trip times in milli-seconds:
Minimum = 93ms, Maximum = 96ms, Average = 94ms


And there is a demonstration of the dynamic name resolution of "ghs.google.com".
64.233.179.121
hs-in-f121.google.com
66.249.81.121
bx-in-f121.google.com


And, seeing as "www.martinezumc.org" resolves properly, in this example to "66.249.81.121", we can conclude that the 404 above is coming from Google, not GoDaddy.

The host named "ghs.google.com" is a load balanced server array. It's provided to give your readers the best performance possible, when visiting your blog.


And, last but by no means least, the DNS Report for "martinezumc.org".

Please follow me now to the next post in this series.

>> Top

Friday, January 12, 2007

Your Blog, And Its Dual Personality

When I write a blog post, like this one, Your Blog, And Its Dual Personality, it has a known URL - http://bloggerstatusforrealbeta.blogspot.com/
2007/01/your-blog-and-its-dual-personality.html
. It also has a second URL - http://www.bloggerstatusforrealbeta.blogspot.com/
2007/01/your-blog-and-its-dual-personality.html
. Try the two links, and see for yourself.

(Note): This post has been replaced by (and substantially rewritten, to reflect major changes to the custom domain product) The Real Blogger Status: Schizophrenia and Custom Domain URLs. You may also find insight in The Real Blogger Status: Your Browser Cache, and Web Sites With Dual Addresses

That's real, but it's not terribly useful. I advertise this post as http://bloggerstatusforrealbeta.blogspot.com/
2007/01/your-blog-and-its-dual-personality.html
, not as http://www.bloggerstatusforrealbeta.blogspot.com/
2007/01/your-blog-and-its-dual-personality.html
, intentionally. This blog is "bloggerstatusforrealbeta.blogspot.com" - "www.bloggerstatusforrealbeta.blogspot.com" is not necessary.

But what if this blog was "bloggerstatusforrealbeta.com"? That would make this post http://bloggerstatusforrealbeta.com/
2007/01/your-blog-and-its-dual-personality.html
. If properly setup, it should also be addressed as http://www.bloggerstatusforrealbeta.com/
2007/01/your-blog-and-its-dual-personality.html
.
(Note): Since I haven't setup a domain "bloggerstatusforrealbeta.com", don't expect to click on any of the latter links, and get anything useful. Sorry.

The point here is that "bloggerstatusforrealbeta.com" and "www.bloggerstatusforrealbeta.com" should be synonymous - for a domain that only contains a blog. For other domains, this may vary.

For many domains, the "www" prefix will be synonymous with the root - but not for Google Custom Domains.


  1. I pay for the DNS listing, which tells your computer where my blog is.
  2. I setup a DNS entry, pointing "bloggerstatusforrealbeta.com" to "ghs.google.com".
  3. I setup Blogger to publish to the custom domain.


From what I see, redirecting "bloggerstatusforrealbeta.com" to a web site on a Google server involves two address records.

  1. A CNAME record at my DNS service, forwarding "bloggerstatusforrealbeta.com" to "ghs.google.com".
  2. A pointer at "ghs.google.com", forwarding "bloggerstatusforrealbeta.com" to the actual physical website.

http://help.blogger.com/bin/answer.py?answer=55373
Google hosts lots of blogs, so we have to make sure the right one is associated with this domain.


My guess is, when I tell Blogger to publish my blog to "bloggerstatusforrealbeta.com", and to host the content on their server, they do three things:
1) Create the content, with links using "bloggerstatusforrealbeta.com" as the base URL.
2) Copy the content to the web server, in the proper location.
3) Create a pointer, on "ghs.google.com", indicating where the content was copied.

The result is that I have a pointer indicating the location of "bloggerstatusforrealbeta.com". I'd bet that also setting up a pointer for "www.bloggerstatusforrealbeta.com", indicating the same location, was a detail that Blogger overlooked.

The bottom line? I can setup a pair of CNAME records in my DNS service, both pointing to "ghs.google.com" - "bloggerstatusforrealbeta.com" and "www.bloggerstatusforrealbeta.com". But, without a pointer on "ghs.google.com", indicating the server where "www.bloggerstatusforrealbeta.com" is located, I'm out of luck for addressing this post as http://www.bloggerstatusforrealbeta.com/
2007/01/your-blog-and-its-dual-personality.html
.

(Edit 1/15): Using "martinezumc.org" as a publishing target for "martinezumc.blogspot.com", I see complete agreement with the above.

>> Top

Wednesday, January 10, 2007

Custom Domain Names and the DNS Settings

The Google Custom Domains, and the possibility of having a non-Blog*Spot address without the lack of functionality from setting up an external published blog, are a major improvement over plain old Blog*Spot to some folks. But be aware - some technical expertise is required.

Setting up a DNS entry is not a normal task for Bloggers. The draw of Blogger One Button Publishing is that you

  • Choose a Blog*Spot address.
  • Choose a template.
  • Post and publish (and for New Blogger, forget the "publish" too).
So what's up with setting up DNS?

There's some occasional confusion in the forums.
The site says to create a CNAME for example.com.. CNAMES are not for DOMAIN NAMES, they are for subdomains.. i.e, www, pages, users. DOMAIN NAMES use A records to point to an IP address.


But the difference between an A record, and a CNAME record, is pretty simple.
An A DNS record directly equates a hostname to an IP address.

A CNAME DNS record does not directly resolve to an IP address. Instead, it refers to a relative or absolute hostname.

When a DNS query is made for a CNAME, the hostname that is pointed to is used to obtain the actual IP address. The pointed-to hostname may itself be another CNAME, or it may directly provide the IP address using an A entry.


As an example, let's look at Google Apps for Your Domain: Creating Your Canonical Name (CNAME) Record: GoDaddy.com.
  • Click Add New CNAME Record. If you've already created a CNAME record for your website's address with Google Apps, click Edit next to the existing CNAME record.
    • Enter the part of your website's address that you picked in your Google Apps control panel. For example, if you picked urban.mydomain.com as your address, enter urban for step one.
    • Enter ghs.google.com as the host name.
    • Leave as default selection.

Not too much confusion there. As long as you decide upon your domain names before you start, it's just another recipe. Mix a, b, and c, and serve.

(Note): For some detail about DNS records, see PCMagazine Definition of: DNS records. For still more technical detail, you can see FAQs.Org: How DNS Works. Or see my case study, Google Custom Domain - Case Study #1

>> Top

Saturday, January 06, 2007

Setup Your Google Custom Domain Name Properly

To let you have your blog using a custom domain name (not yourblog.blogspot.com), but without most of the drawbacks of a New Blogger blog published externally, Blogger now provides custom domain names, where you can have, besides yourblog.blogspot.com, yourblog.com.

(Note): This post has been migrated to (and improved in) The Real Blogger Status: Setup Your Google Custom Domain Name Properly.

To setup a custom domain name, you simply

  • Setup DNS (at your expense) to point your blog's URL to a Blogger server.
  • Setup your blog to publish to the custom domain.


Like all Blogger products, this one is a little Beta still.

Don't Cause A Redirect Loop
If you currently have your blog hosted as yourblog.blogspot.com, and you republish it as yourblog.com, Blogger will even maintain yourblog.blogspot.com for you, and forward all traffic to yourblog.com. And there is one problem.

If you observe my advice for transferring your blog to external publishing, you'll create a stub blog as yourblog.blogspot.com, and you'll setup a forwarding from the stub blog (either a manual link, or an automatic redirect) to yourblog.com.

In some cases, you might try the reverse. Maybe put your blog on yourblog.blogspot.com, and forward traffic from yourblog.com to yourblog.blogspot.com. This, however, is not a good idea. If you setup an automatic redirect from yourblog.com to yourblog.blogspot.com, then publish a second blog to your custom domain yourblog.com, your readers will watch their browsers try to load yourblog.com, which will redirect to yourblog.blogspot.com, which will then redirect to yourblog.com. And so on.

So, if you are going to publish to a Google Custom Domain, forget about the stub blog. Blogger will handle that for you.


Wait Until DNS Points To Google
In Blogger Help: How do I use a custom domain name on my blog?, we see

It appears that Blogger checks out your domain name, and if it points to somewhere other than "ghs.google.com", responds with
Another blog is already hosted at this address.
If you get that response, verify the IP address of your domain, by pinging. If the ping comes back with
Pinging ghs.l.google.com [64.233.179.121] with 32 bytes of data:

Reply from 64.233.179.121: bytes=32 time=93ms TTL=245
Reply from 64.233.179.121: bytes=32 time=111ms TTL=245
Reply from 64.233.179.121: bytes=32 time=116ms TTL=245

or the like, your domain is ready. Otherwise, you need to wait until it is ready. Or face getting
Another blog is already hosted at this address.

A Possible Problem With The .Info TLD?
Jon Anderson writes
In a nutshell, it doesn't work with the TLD (top-level domain) of .info. More than one person is experiencing, and writing about, this problem.
Maybe a timing issue with the .Info TLD servers? I hope this one isn't just solved in silence.

(Edit 2/4): Blogger Buzzer states that
Currently .info doamins are disallowed due to the large number of spam blogs on these kind of domains.


Don't republish straight from FTP to a Custom Domain.
When you republish your blog from Blog*Spot to a custom domain, the blogspot URL of the blog is forwarded to the custom domain. So the blog starts out with the "xxx.blogspot.com" address.

When you have a blog published to an address outside of Blog*Spot, using FTP, then republished to a custom domain, you don't have a corresponding Blog*Spot URL - just the external address that you have just forwarded to "ghs.google.com". So what gets forwarded? Apparently nothing, and that may be a problem.

So, before you publish to a custom domain, take your FTP blog, and publish it back to a Blog*Spot URL. Blogger will forward the Blog*Spot URL to the custom domain, when you republish the blog to the custom domain.

Blogger Plus blogs can't be published to a Custom Domain.
Blogger Buzzer explicitly states that
Unfortunately currently there is a limitation that plus blogs cannot be converted to be served from a custom domain.


>> Top

Friday, January 05, 2007

Custom Domain Names Hosted By Blogger

Up to now, if you wanted a blog (web site) named myblog, you had 2 choices.

  1. Setup myblog.blogspot.com, hosted by Blog*Spot, and with all of the shiny features of (now) New Blogger.
  2. Setup myblog.com (myblog.org, ...), hosted by a host of your choice (and extra cost in most cases), but with less features than a Blog*Spot hosted blog.


Note: This post has been migrated (and significantly enhanced) as The Real Blogger Status: Custom Domain Names Hosted By Blogger.

Now, there is a third choice. Setup myblog.com (myblog.org, ...), hosted by Blog*Spot.
  1. You pay for the DNS listing, which tells your reader's computers where your blog is.
  2. You setup a DNS entry, pointing "myblog.com" to "ghs.google.com".
  3. You setup Blogger to publish to the custom domain.
(Note): Set the domain up carefully.

This solution has its good, and its bad, points.
  • The Good:
    • Save money. No need for an extra cost hosting service.
    • All of the shiny features of New Blogger.
    • None of the unstable publishing problems, reported of late.
    • Your current Blog*Spot address will continue to work, and to forward to your new, custom domain.
    • No more abandoned Blog*Spot address, and no more subsequent splog hijackings.
  • The Bad:
    • If you opted for external publishing to get away from Blog*Spot hosting, this isn't for you.
    • If your domain contains more than a blog - ie maybe a chat room or FTP server, this may be a problem. You have two possibilities here.
      • Have two named domains - one inside Blog*Spot, the other outside, and links between the two.
      • Setup a subdomain DNS record, pointing to "ghs.google.com". Make sure that all of the links between the website and the blog are absolute, ie "http://myblog.mydomain.com", rather than "/blog".


(Note 1/16): There's a lot of theory here. See Google Custom Domain - Case Study #1 for an actual exploration of the facts. And see Setting Up A Custom Domain? Here's Advice, for a review of the essential steps that you must follow.

>> Top

Thursday, December 28, 2006

Publishing Externally? Here's What You Get

Every day now, you see the question

I just upgraded my account and blog to New Blogger. Where is my Layouts template / my Label list / my link to Upgrade my template?

and you look at the blog URL (when it's included), and it's not yourblog.blogspot.com.

And the answer is always that, when you publish externally (aka FTP publishing), you don't get any of those features. New Blogger 2006 requires publishing to blogspot.com, for maximum benefit.

The New Blogger 2006 Blog*Spot servers publish the blog as the reader retrieves each page. They don't publish static HTML, they publish dynamic XML. When you publish by FTP, Blogger is copying old static HTML code to your FTP server. HTML won't get you
  • Improved Archives, with multiple selectable views, and individual titles.
  • New Layouts template, with GUI configured page elements.
    • Feeds.
    • Labels.
    • Linklists.
  • Improved Main Page view, multi-paged, with each page limited in size by the "Show days / posts" setting.
  • Improved Template editor, with scripted save and restore of template code.
  • The ability to require authentication, and to designate readers, to view the blog. Any blog published by FTP is open to view by all.
What it will get you is
  • Authentication by Google account.
  • Labels for the posts. You can use the labels in various ways, without the Layouts template based Label page elements.
    • Make your own Label lists, from the labels shortcuts after each post.
    • Select a label shortcut after a post, and view all posts with that label, in a single page Main Page view.
  • Improved Edit Posts menu, again with labels.
  • The new, more stable Blogger.
  • The shiny new Navbar (that you can continue to turn off).
  • The continued spinner of death, when you publish (sorry, but static publishing will continue to have this).
  • Your own, externally published website, that you can control (though not protect) as you see fit.
  • A domain name that you can choose. This may not be exclusive to external publishing.


Nor can you have private blogs. See Settings - Publishing.
Hint: If you want to publish to an external FTP server, you will need to Set 'Blog Readers' to 'Anybody' and use a Classic Template.


Now, if the above issues are a problem for you, but you don't want your blog hosted on Blog*Spot, check out Google Custom Domains. Read my case study, and read about the possible complications, too.

Wednesday, November 22, 2006

No More Previous Posts

The old 10 Previous Posts list is no more. Knowing that a blog was originally designed as a journal, it made sense that any post would link to previous posts only. You can't predict the future. But the limitation of 10 posts always bothered me, as it did many Bloggers. And every month, somebody would ask

  • How do I get a list of more than 10 posts?
  • How do I get a list of previous posts, in reverse order?
  • How do I get a list of the 10 earliest posts?


So now, previous posts is combined with the archives. And you can see a list of all posts, in any one of three styles.
  • A collapsible hierarchy.
  • A flat list.
  • A dropdown menu.


Each of the styles can list the selections in reverse order (oldest first). Each can display by month, by week, or by day. And the first, hierarchy, even has an option to display post titles, ie table of contents, with chapters by date. No more muttering to yourself
Now, I know I wrote that post sometime last month - but what did I call it?


So, as I described it elsewhere, it's not
New Blogger doesn't have a previous posts list.

It's
New Blogger doesn't need a previous posts list.


So How Do I Use This New Feature?
Adding the Previous Posts, in a Classic blog, required you to edit the template. With a New Blogger blog, properly migrated, you simply go to Page Elements, under Template. Then add another page element, a Blog Archive, and configure it as you like.

My Blog Archive is called "Other Articles", and is selected as
  • Hierarchy.
  • Show Post Titles.
  • Archive Frequency: Monthly
  • Date: 2006 and Month: January (this is key in the collapse mechanism).
Configure yours as you prefer. Experiment with different possibilities, and find which suits your needs.

Beta WishList

Some items are actual bugs in Beta, others are design deficiencies. They all need to be communicated to Blogger, by the Blogger WishList.

(Note): This article is where I list my personal wishlist items. If this list encourages you to complain to Blogger, about these or other issues, I'm encouraged when you comment here, but you have to use the Blogger WishList, for any real chance of seeing positive results.

The purpose of this post is merely to identify the technical issues, so you can objectively state the facts to Blogger when you recommend changes to them. It's not a substitute for the Blogger Contact or the Blogger WishList forms.


  1. With blogs published on Blog*Spot, "www.myblog.blogspot.com" appears to be equivalent to "myblog.blogspot.com". This is nice, but not so essential. But with blogs published to custom domains, "www.mydomain.com" does not appear to be equivalent to "mydomain.com", even with carefully setup DNS references. And AdSense does not work, in this situation.
    Custom Domains: Make "www.customdomain.com" reliably equal to "customdomain.com", in all cases. And end the monolithic error - provide diagnostics.

  2. Provide a tool to use before, and during, blog migration.
    Migration Support Tool: Provide an estimate of time required for any blog to be migrated, AND / OR a migration progess indicator.

  3. Give us the ability to transfer Beta blogs from one administrator account to another. Don't give the creator of the blog permanent, unrevokable administrative status.
    Blog Ownership: Give us the ability to transfer blog ownership, from one account to another.
    (Edit 6/13): This ability has now been provided.

  4. Fix the spacing problems caused by including an indented post component, like <blockquote>, <ol>, <ul>. The workaround required, to make our posts look clean and consistent, is either painfully tedious, or causes reduced readability.
    Text Formatting: Fix the spacing problem caused by inserting an indented text element, like <blockquote> ... </blockquote>, into our post.

  5. If we create or edit a post, we get the Post Published screen, which has links to View Blog. How about the ability to view the post just updated? If it's not the most current post, it won't be at the top of the blog. It would be so cool to be able to view the post itself, without having to search thru the blog again.

  6. The New Blogger NavBar lacks components found in the Classic NavBar. Are these omissions intentional? If not, how were they overlooked?

Monday, November 13, 2006

Putting A Post At The Top (A "Welcome" Post) - Beta

Layouts template Blogger blog posts are sequenced as Classic Blogger blog posts - by date, in reversed sequence. This means, again, that the newest post will fall at the top, and every time that you make a new post, it will be visible above any previous posts.

Just like a Classic blog, you can make the posts display in any order that you like - just change the date of each post. This is called a work around. With a blog of any size, and activity, you'll note that it is a very painful one.

In a Layouts blog, though, we have one improvement. You can create a special post, and have it "pinned" to the top of the blog. I created a brief Welcome message, which is at the top of this blog, just below the header, but centered like a post.

When you're in the Layout Editor, select "Add a Page Element". Select an HTML / JavaScript, or a Text, element. You can create content using either Rich Text, or HTML, at your convenience. After you create your new element, you can drag and drop it anywhere in the layout - at the top of the post column, or the sidebar, or even at the bottom of the post column.

Positioning a new page element, using the layout editor, can require some experimentation. When you move the new element over the area where you would like it to be, it may drop centered on, another area of the blog. When it does this, move it ever so gently in the right direction, a couple pixels or so, until it positions properly. When it is positioned where you want it, release it, and it will fall into place, properly positioned and sized.

>> Top

Saturday, October 14, 2006

Authentication - And Confusion

One of the long awaited features in Blogger Beta was the ability to restrict access to your blog. Designating your blog as private, to be read by authorised parties only, was a much requested feature.

Blogger Beta uses your Google account to identify you, and verify that you are authorised to view any blog (including yours). And that causes occasional concern, fortunately unnecessary in this case. Seeing your Google account, which coincidentally may be the same as your email address, as you peruse your blog, is a bit scary.

Rest assured, though, as you see your email address in your Navbar, every visitor to your blog is seeing their own email address in their Navbar. Nobody else sees your email address.

And if you're seeing an increase in spam recently, rest assured that it's not related to your Blogger Beta account, or your Google account, being visible to spammers.

  • Improved spam filtering requires increased spam volume, in order to allow the spammers to maintain a constant income level.
  • Increased availability of bots makes the increased spam volume possible.
None of this, unless your computer has become part of a botnet, is related to anything that you have or haven't done.

Relax just a bit. Concentrate on other, more urgent, issues - like the coming Beta migration. But accept the inevitable - you will need a Google account to use Blogger.

Your (Blogger) Google account, and your (GMail) Google account don't have to be the same, though. Google accounts are free, and you can set up another, if you like.

(Note 2/13): As noted by Pete in his separate comment, your email address is kept private, by carefully designed code:
The iframe separation keeps arbitrary Blog*Spot blogs from reading (for example) your Google Account e-mail address when you're logged in.


>> Top

Thursday, September 14, 2006

Beta Evaluation

Today is September 16. I made my first post in this blog on August 16, so this is my one month evaluation.

The Good


  • Labels.
  • Archives, to replace Previous Posts.
  • The Page Layout editor / GUI Template.
  • The improvedTemplate editor.
  • Private blogs, requiring authentication.
  • The improved Main Page view.
  • The improved Edit Posts screen.
  • Various minor tweaks.
    • The Edit Posts screen lets you page forward and backwards, when there are more posts then will fit on the maximum requested posts screen.
    • The post editor actually highlighted an error, in addition to saying that I had made one.
    • Instant publishing - no spinner of death.


The Bad


The Ugly


The Good

Labels
If I was to pick one feature which would keep me in a Beta Blog, it would be Labels. The ability to associate posts by keyword, dynamically, is useful. Just that. But take that ability, and generate a custom main page view, of all posts with that keyword. Way more than useful. Very user friendly.

Archives
The old 10 Previous Posts list is no more, it's been integrated with the archives.

The Page Layout (aka Page Elements) Editor
The ability to customise 75% (my guess) of all blog features, using a GUI process, is a big relief. The template editor is not very user friendly. But defining commonly used features in a GUI process, and letting us change their characteristics, goes a long way towards making the template editor unnecessary.

Just moving elements within the page is a major improvement. Want a link list at the top of the sidebar? Grab it, drag it, and drop it. Want to change colours and / or fonts? We now have a standardised setting process for that. No more "Why did that change size?").

The slightly improved Template editor.
The template editing process, while substantially like the old, helps you to save and restore your current template, using a GUI process. This will encourage each of us to save our templates more readily, which will reduce stress level when editing templates, which may reduce mistakes. I know that it will for me. Plus we can make smaller changes, leading to more understanding of what we are doing, and possibly less mistakes.

And a possibility for endless activity - template HTML now supports Javascript. I am just getting in to this - but there is real potential for pushing into new territory.

Authentication
Using a Google account / password to authenticate ourselves allows blogs to be made private for viewing, as well as for adminstration. And it integrates well with the menu of blogs (ie "dashboard") under our control.

The Improved Main Page View
Under Classic Blogs, you could have 2 views - main page, and article. You could have an article view of any specific post, but you could have a sequential ("main page") view of only the latest 10 (or whatever number the blog owner determined) posts. If the articles of interest weren't in that latest x number, it was time to look by post name. Oh yes, there was no post name list (excepting of course the 10 previous posts). Good luck finding a post by title!

Now, your main page view is unlimited. The limitation simply affects how many in a single view - when you get to the end of the page, just hit "Newer" or "Older". And integrating Label search results into main page view makes it great.

The Vastly Improved Edit Posts Screen
Start with the first improvement that I saw weeks ago. When you peruse the Edit Posts list, if you decide upon a limit of 50 posts, that's now just 50 posts on the first screen. More than 50 posts? Hit "Older" ("Newer").

And it gets better. All posts are listed, with their Labels. Want a comprehensive list, by post, of all labels used? Here it is.

And in another column is a master list of all labels. If you click on one, the list of posts shows all posts for that label. And each post listing all labels for that post. Want a labels cross-reference? Here it is.

And we have ability to select listed posts, and then to add or remove a selected label. Need to change one label for another? Here's a list to do this from, quite painlessly.

And a minor (but not very much so) item. For each post with Comments, you get a link to view the comments for that post.

Various Minor Tweaks
A nice experience here. I actually went to Publish a post, and was told that I was missing an opening "<a>" (unbalanced "</a>"). The difference here was that it highlighted the offending "</a>"!

The spinner of death is no more. When you Publish a post, or edit the template, your changes save instantly. No more waiting. YAY!

The Bad

Feeds

Authentication

Publishing To External Servers

Post Summaries

There's No Going Back, Folks!

Not all features are available to blogs that are published externally (aka FTP blogs).

>> Top

Wednesday, September 13, 2006

MultiStyle Label Lists


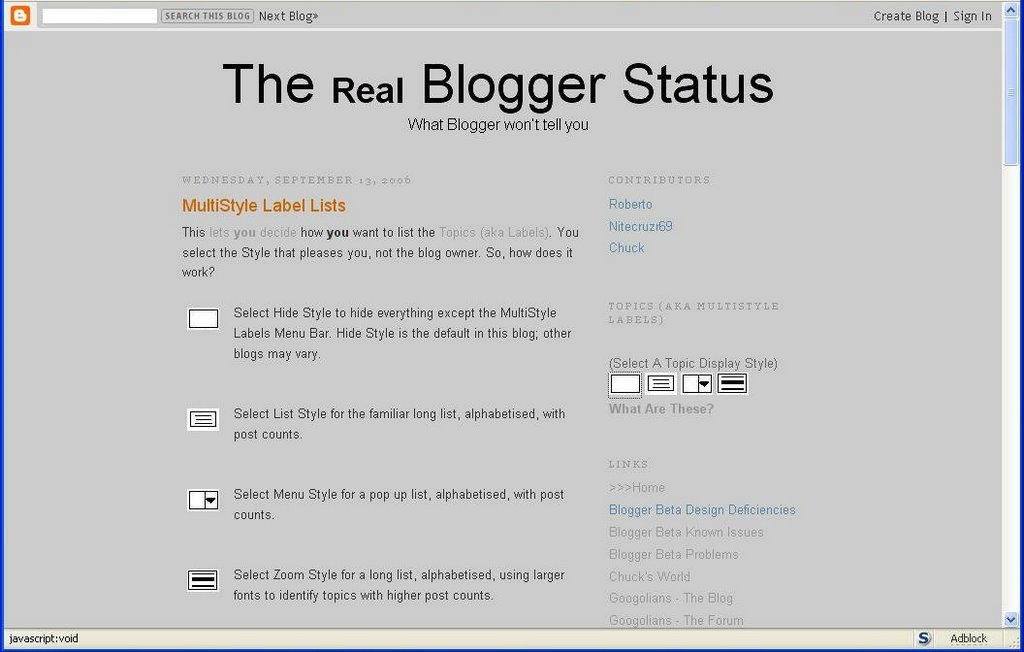
This lets you decide how you want to list the Topics (aka Labels). You select the Style that pleases you, not the blog owner. So, how does it work?

Hide
Select Hide Style to hide everything except the MultiStyle Labels Menu Bar. Hide Style is the default in this blog; other blogs may vary.


List
Select List Style for the familiar long list, alphabetised, with post counts.


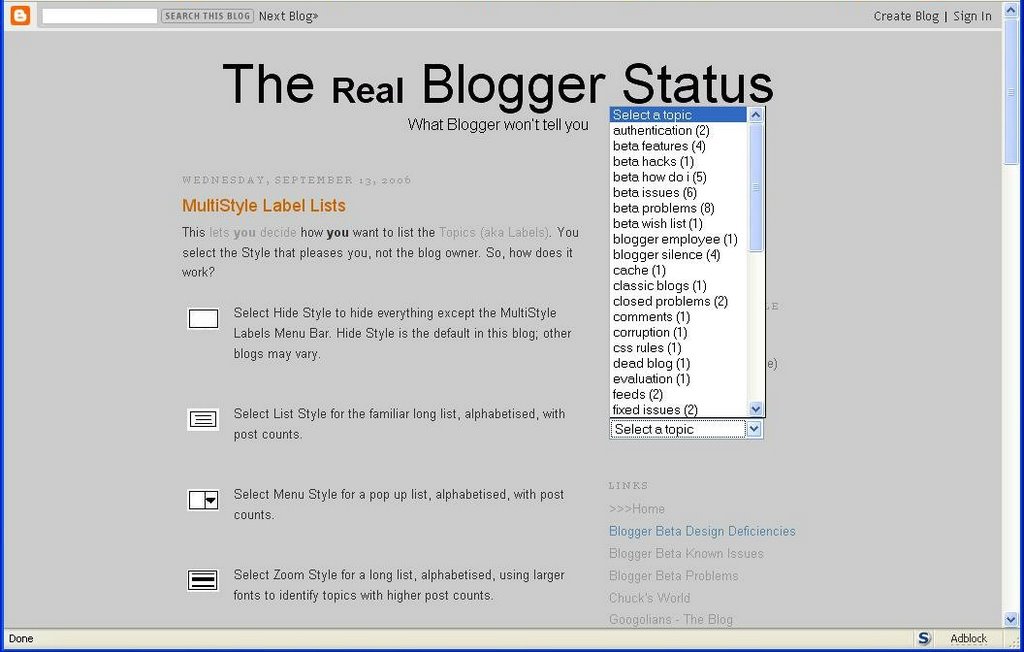
Menu
Select Menu Style for a pop up list, alphabetised, with post counts.


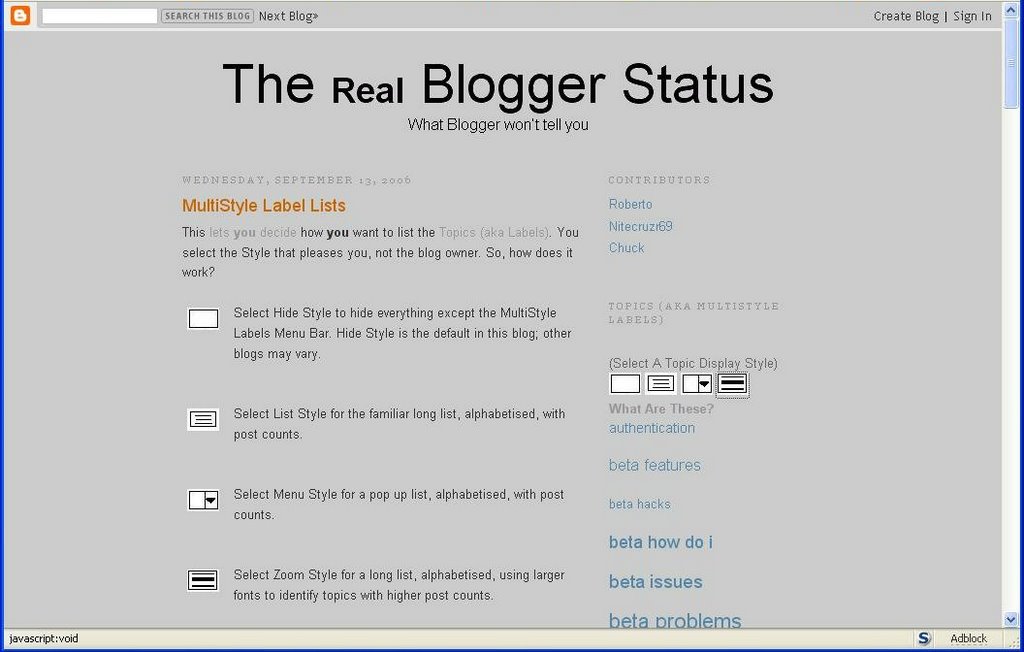
Zoom
Select Zoom Style for a long list, alphabetised, using larger fonts to identify topics with higher post counts.


(Question): This rocks! So, Chuck, how do I get this into my blog? For the answer, see Cumulus Blogs: Adding CumulusTopics Code Into Your Blog

Template Editing

Along with Labels, the Beta template editing ability is probably the neatest feature in Blogger Beta. The GUI Page Layout editor is totally kewl.

Not too many folks realise though that you can edit page elements from other than Page Layout editor mode. When we're logged in as an administrator, we can make changes to the individual page elements, just as we can edit posts. Similar to the "Edit Posts" pencil at the bottom of each post, you'll find the "Edit" widget at the bottom right of every page element.

And here's some confusion.

How in the world do I get rid of the cute little dragonflies that seem to be a part of the template that I have?? I do not know enough about the HTML to find them or what they might be called.

Well, I've been studying the HTML / XML, but I don't know the name myself. It does sort of look like a dragonfly, though. It's just another thing that got put, into Blogger Beta, without a name. Another violation of one of my principles
Everything gets a name.

Fortunately, named or not named, it's only visible to you, in a specific situation. And, once you explain that to folks, the general philosophy is
I can live with that, as long as the readers aren't seeing it.

And they're not seeing them. Only you can see them, in a specific situation.
  • When you are logged in to the blog as an administrator.
  • When the blog has Quick Editing enabled.


There are 3 ways to prevent the dragonflies from displaying.
  1. Log out from your account.
  2. Disable Quick Editing.
  3. Edit your template.
    1. Backup your template.
    2. Select "Expand Widget Templates".
    3. Find, and replace, all instances of
      <b:include name='quickedit'/>
      changing each to
      <!-- <b:include name='quickedit'/> -->
    4. Save Template changes.


(Note): You may find it necessary to clear browser cache, after doing the above, to make sure the dragonflies will be gone.

Beta Enhancements

No product will ever be released with all of the possible features immediately included. Any product ever treated that way will never be released, becuase the vendor will keep adding and deleting features.

So we shouldn't be surprised that Blogger Beta has problems. And it has design limitations, and other issues. And there are other features which, in our own personal opinion, should have been included.

The Post Published Screen
When you edit a post, and you hit Publish, you are taken, immediately, to the Post Published screen. Yes! No more spinner of death (among other terms used). But having done that, you click on "View Blog", and go back to main page view. How about a link to "View Post"? That would make it so much easier to test what we just wrote.

Or have you never finished a (you thought) bang up job, published, and waited for the raves to pour in? And looked at the first rave, which said

Dude, that sucks. Why did you do that?

So you look at what you had done, maybe from another browser, and find that you had made a mistake.

Always test after making changes. Check each link, for instance. Preferably in each browser. And testing, in general, would be more instinctively done, if we had a link on the Post Published screen, that went straight to the post just finished. At least, for me.

Making Comments On My Own Blog
Sometimes, I moderate and publish a comment that warrants a response. Since most comments are made anonymously, it's easiest to post another comment.

But getting thru the comment entry form (and the obnoxiously small comment form is another subject), having done that, I am left with a Captcha. Why do I have to fill out a Captcha, if I am logged in to my own blog?

Labels

To put it simply, this feature rocks.

Here's a dynamic search for all posts about Beta Problems (label "beta problems"), in this blog. Why dynamic? Because it's evaluated each time that you click on the link (possibly within limits of your cache).

And instead of an ugly search hit list, where you get snippets of useful information, that you have to hunt for (ever try finding an article title, or the URL, in a typical search hit entry?), you get a customised main page view of your blog, with all of your customised amenities and layout, showing only the posts relevant to the label selected. Very user friendly.

And look at the end of this post. See the labels listed? Click on any one. Yep - another dynamic search - on that label. Keyword cross referencing.

To add them, just type any keywords, as desired, into the box at the bottom of the post edit window. They aren't case sensitive, so just lower case, comma delimited, as many as relevant for any post. And as you type, you'll get a popup menu of already entered labels, so you can pick ones already in use when possible. No misspelled labels. When you feel the need to change any, just add, change, or delete words, in the list, in each relevant post.

There's even a selection to the right of the Labels box, called "Show all". That opens a cloud display, showing all labels defined, for all of the posts in that blog. Just click on each relevant label, and it gets added to the list for that post. What could be easier?

Start using labels early, while your blog is young. It's easy to type in 2 or 3 keywords, into the labels field, whenever you add or update a post. When you have a couple dozen posts, and have to add the labels then, it won't be quite so much fun. I speak from experience here.

When you have labels defined for your posts, you have numerous options for referencing them.

  • Already there for you - the labels menu at the end of each post.
  • In the sidebar, or at the bottom, you can add a Page Element, listing the labels in your blog. You can, of course, rename the list - mine are called "Topics aka MultiStyle Labels". Or you can forget about the plain one style label list, and go straight to MultiStyle Labels.
  • You can have a feed for each label.
  • You can even have a link, in the post. Look here for other posts about How Do I Use Various Beta Features, as an example.


Now, for the next step in the evolution of The Real Blogger Status - Beta, check out MultiStyle Label Lists, courtesy of HackOSphere and CumulusBlogs.