
Customising The Header In A Beta Blog
Earlier, I wrote about how to Restore The Main Page Link To The Title, in a Beta blog. That was a hack, and a messy one at that. Blogger fixed that little omission, so it's no longer necessary. The blog title is now clickable, and links back to main page view - in a blog with default setup - just as it did for a Classic blog.
But it's still boring text - a title, followed by a description.
So some will ask
How do I customise my blog header? How do I (for instance) replace the boring text title with a picture?
You can make this change as you would in a Classic blog, if you wish to edit the template HTML. Personally, I use the GUI Page Layout editor.
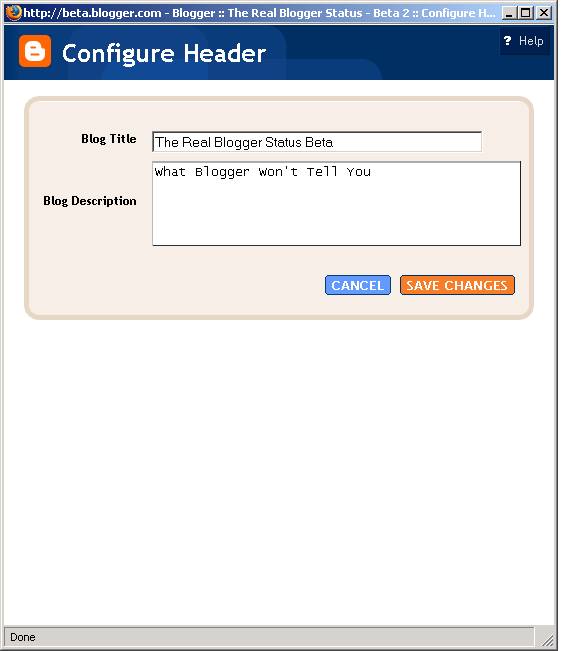
Go into Template - Page Elements. Edit the Blog Header element.
You have several choices here, with the Blog Header.
- Put code into the Blog Title field. You could put both a link and an image into there
<a href="http://bloggerstatusforrealbeta.blogspot.com/index.html">
<img border="0" src="http://photos1.blogger.com/blogger2/
560/527000594325287/1600/RBS%20Header%201.gif"/></a>
except for one major problem. It just won't fit. - You could put the code into the Blog Description, except for another limitation. You can't have a blank Blog Title field. If you put your header code into Blog Description, what can you put into Blog Title that doesn't look tacky?
- I prefer to get rid of the Blog Header altogether, and replace it with a straight HTML page element.
- You could remove the Blog Header, and replace it with a background image.

If you're lucky, you can just remove the Header page element.
If not, you won't be able to remove it, immediately.
If you see the second image - ie no "Remove Page Element" button, go to Edit HTML. Find the section of code
<div id='header-wrapper'>
<b:section class='header' id='header' maxwidgets='1' showaddelement='no'>
<b:widget id='Header1' locked='true' title='The Real Blogger Status Beta (Header)' type='Header'/>
</b:section>
</div>
and change "locked='true'" to "locked='false'".
<div id='header-wrapper'>
<b:section class='header' id='header' maxwidgets='1' showaddelement='no'>
<b:widget id='Header1' locked='false' title='The Real Blogger Status Beta (Header)' type='Header'/>
</b:section>
</div>
Then Save Template. Go back to Page Elements.
Now you can just remove the Header page element.

Now, just add a Page Element - HTML. Put whatever code you wish, in the body of the element.
<a href="http://bloggerstatusforrealbeta.blogspot.com/index.html"><img border="0" src="http://photos1.blogger.com/blogger2/560/527000594325287/
1600/RBS%20Header%201.gif"/></a>
<p align="center">What Blogger won't tell you.</p>
The added element will be in the sidebar, or the footer (wherever you created it), so grab it, drag it, and drop it into place atop the blog, where the Header element used to be.
Positioning the new header will require some experimentation; when you move the new element over the area where the header should be, it may drop centered on top of the post column. When it does this, move it ever so gently upwards a couple pixels or so, until it positions properly. When it is properly positioned, release it, and it will fall into place, properly positioned and sized.
Save the changes to the Layout.
Now add or update the meta tags, in the blog header. This gives you an attractive entry in a search hit list.
And finish the job properly - remove the ugly boxes, that are placed around the header by most default templates.
(Edit): In case you're wondering, making the header itself was easy, and involved no expensive software.
- I used Microsoft Word to make the characters.
- I did a Print Screen (Alt-Print Screen) to copy the image to the clipboard.
- I pasted the image into Paint.
- I saved the image as a .bmp file.
- I used Irfanview (freeware) to trim the image, resize it, and make it into a .gif with a transparent background.
![]()


9 comments:
Thanks you so much for this! I couldn't figure out how to add this function back into my weblog! I'll be keeping an eye on your blog for more tips and techniques.
How in the world do I get rid of the cute little dragonflies that seem to be a part of the template that I have?? I do not know enough about the HTML to find them or what they might be called. Thanks, Christan = )
Hi Christan,
The little dragonflies are the icons that let you edit each page element. Only you can see them, when you are logged in as an administrator with the ability to edit the layout of the blog.
This has been asked a couple times in Google Blogger Help, with so far no answer. The general conclusion is that, since they are only visible to those who can make layout changes, they aren't worth fooling with. I have to agree with that conclusion, personally.
If a solution to editing or removing them is identified, I'll post it here. DHYB though.
Well, if only I can see them, then that's fine!! Thanks!!
Hi Chuck,
I think keeping the Header is important as removing it will remove the blogger tag $BlogPageTitle$ which is important for search engines. I did it another way. I added a "Add a Page Element" to the Header and put the graphic there. An example is shown here Guide to Malaysia.
The method I used is in this post:
Adding graphic to your blog header
Do you have any comments?
I thought your tutorial was very good. I was about to go completely bonkers before I found you.
I had no problems at all with your method.
I'll be coming back for more Beta goodies :D
Thank you for the quick fix -- and especially the easy-to-follow directions. I've never really worked with HTML code, so I was intimidated a bit, but this was easy to follow. Best of all, I was able to upload the new banner I just paid someone to make for my blog!
Thank you sooo much for this information. I am a totally not a computer person, but I followed your directions (from an Etsy forum)& changed the title page on my blog to a more personalized banner, & it was soooo easy! Coolness! Thank you!
Thank you very much. the steps you provided were very easy to follow for even me a non-computer guy.
Post a Comment